1. 서론
오늘은 어제에 이어 접근 토큰을 생성해보는 시간을 가지겠습니다.
어제의 포스팅은 다음을 참고하세요.
2. 본론
2.1 Generating Access Token With Keycloak's API
키클락은 기본적으로 access token을 생성하고, refresh token을 발급해주는 REST API를 제공하고 있습니다. 우리는 이 API를 이용해서 우리 고유 로그인 페이지를 쉽게 만들 수 있습니다.
첫번째로, 우리는 아래의 URL을 이용해서 POST 요청을 함으로서 Keycloak으로부터 access token을 획득할 필요가 있습니다.
http://localhost:8180/auth/realms/master/protocol/openid-connect/token또한, 요청은 다음과 같은 JSON body를 가지고 있어야 합니다.
{
    'client_id': 'your_client_id',
    'username': 'your_username',
    'password': 'your_password',
    'grant_type': 'password'
}
요청에 대한 응답으로, 우리는 access_token과 refresh_token을 획득할 수 있습니다.
이 access_token은 단순히 Authorization header에 단순히 위치시키는 것만으로 keycloak이 관여하고 있는 리소스 어떤 요청에도 사용할 수 있다.
headers: {
    'Authorization': 'Bearer' + access_token
}
이 access_token이 만료되면, 유저 이름과 패스워드를 입력하는 대신 우리는 다음과 같은 URL을 POST 요청으로 보냄으로서 갱신할 수 있다.
{
    'client_id': 'your_client_id',
    'refresh_token': refresh_token_from_previous_request,
    'grant_type': 'refresh_token'
}
그러면 키클락은 새로운 access_token과 refresh_token으로 응답해줄 것이다.
2.2 spring boot 앱 만들기
최신 스프링부트 키클락 스타터가 메이븐에 있다고 합니다.
Keycloak-Spring-boot-Adapter는 Spring boot의 auto-configuration을 활용한다고 하는데, 우리는 이 설정을 스프링부트 앱에 적용시키면 됩니다.
프로젝트는 start.spring.io/ 에서만들어봅시다.
저는 다음과 같이 구성해보았습니다.
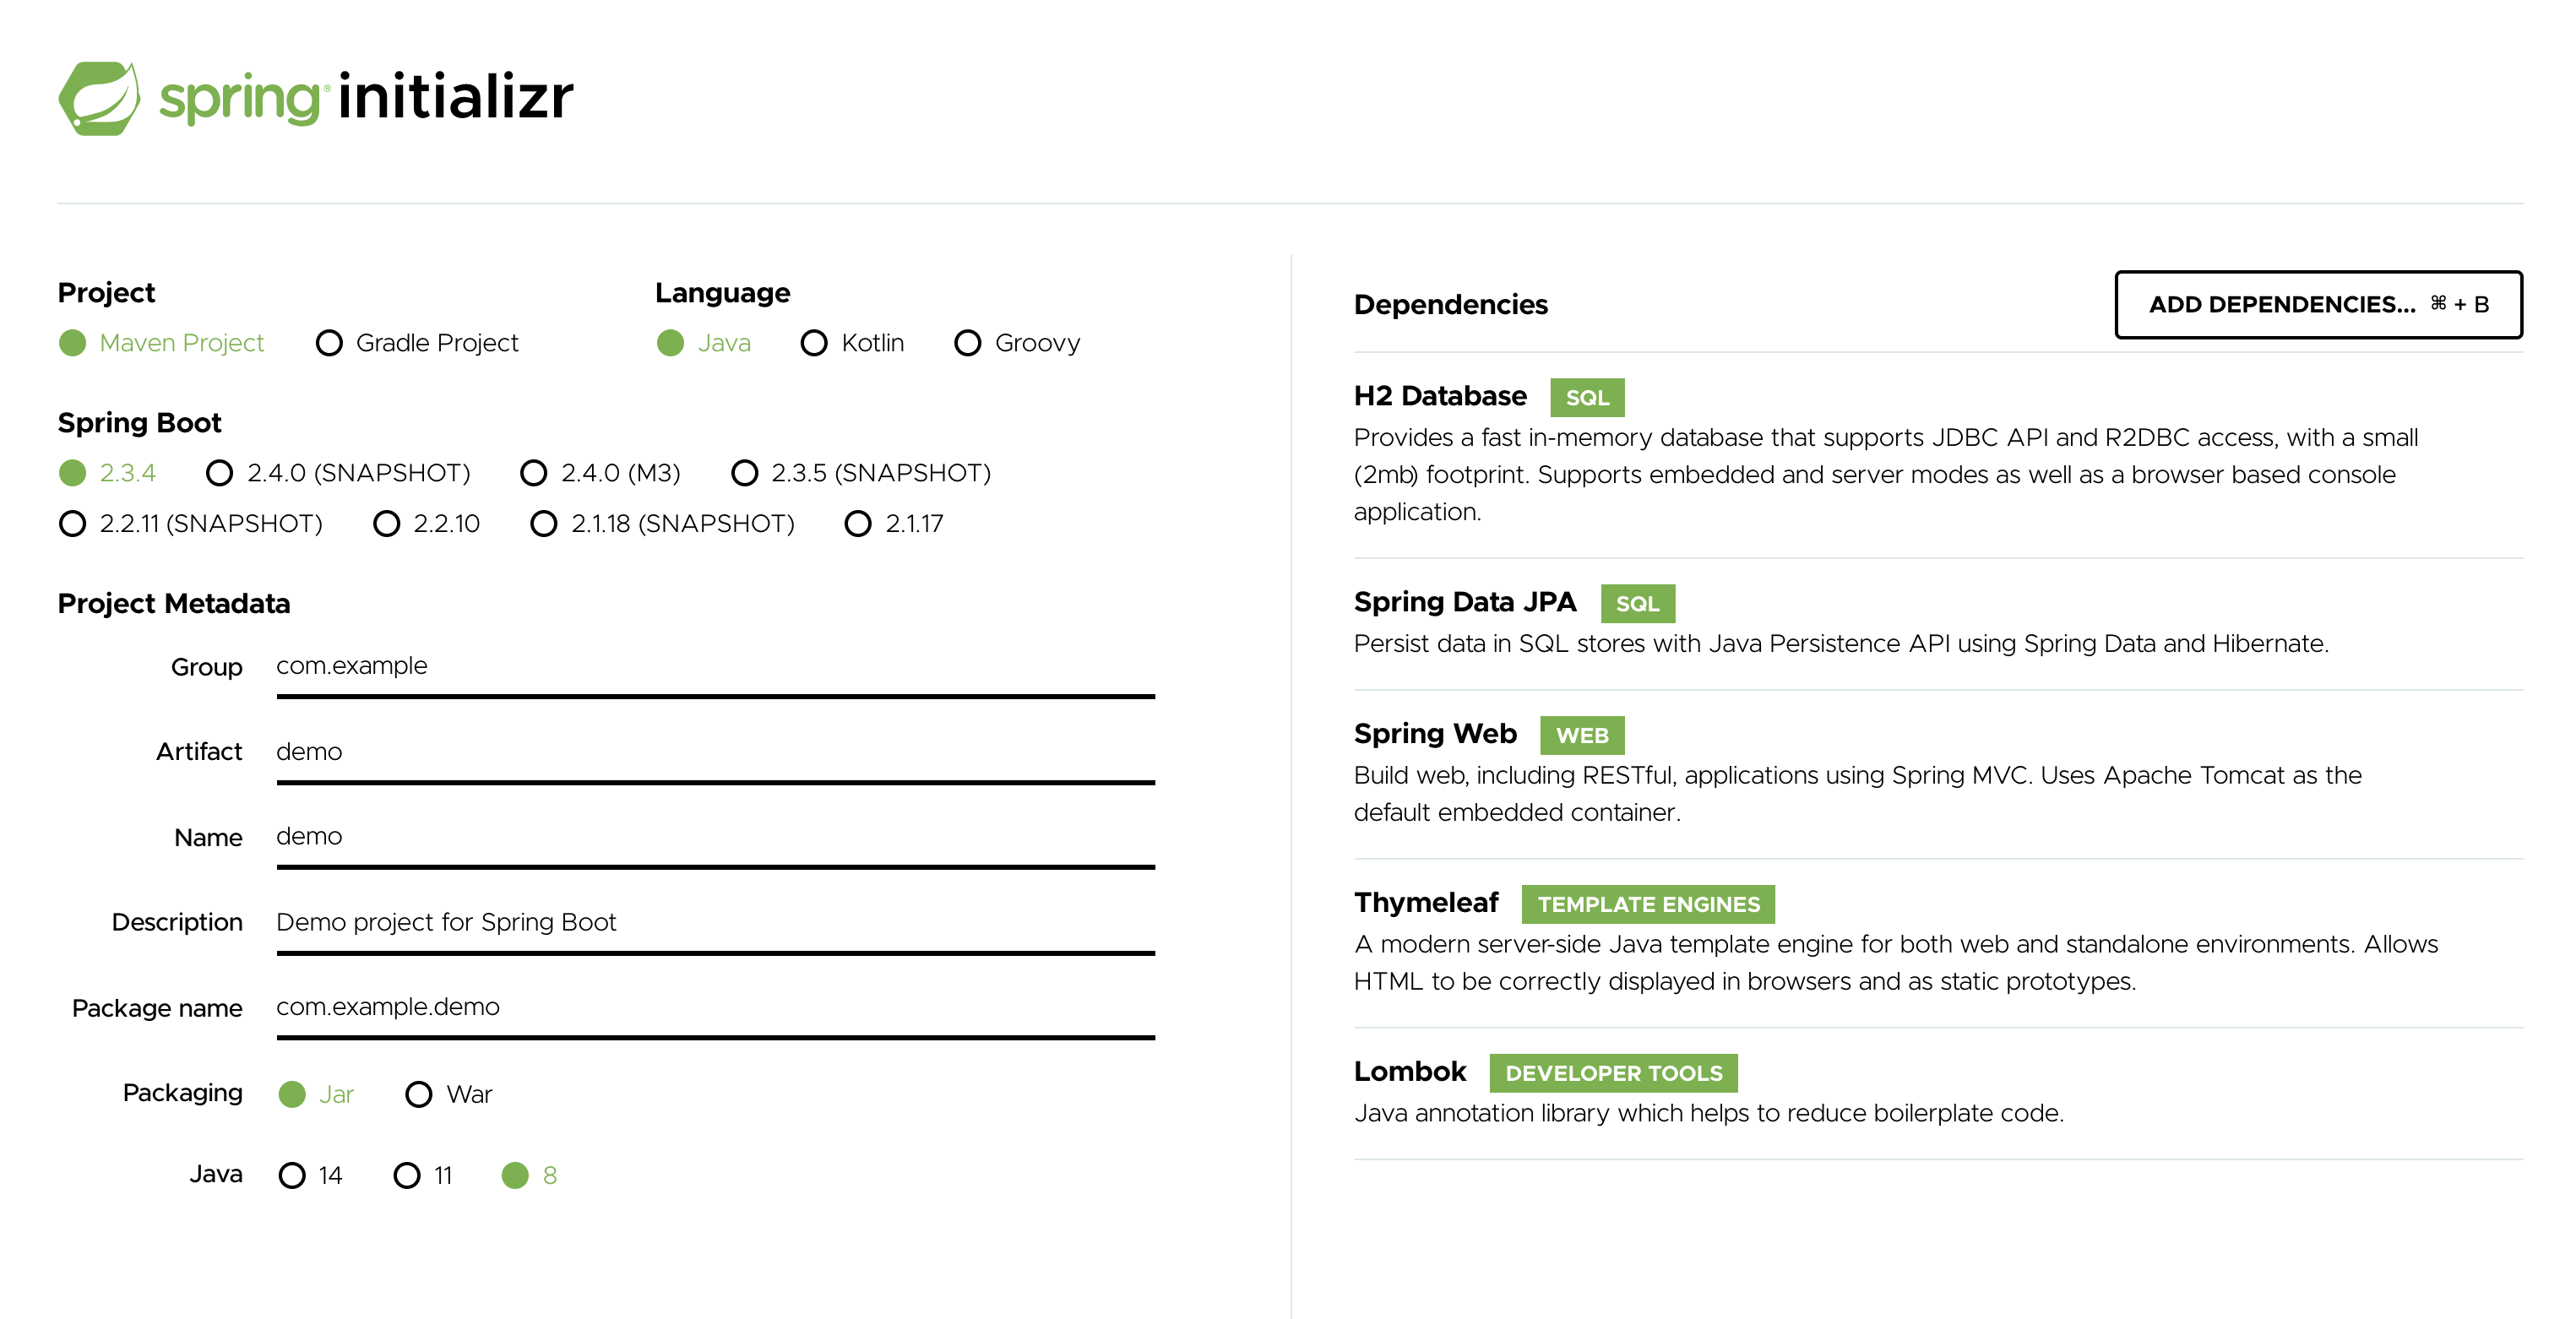
기본적으로 타임리프와 롬복을 붙여넣고, spring web 메이븐을 설정해줍니다.
pom.xml dependency에 keycloak을 추가해 줍니다.
<dependency>
    <groupId>org.keycloak</groupId>
    <artifactId>keycloak-spring-boot-starter</artifactId>
</dependency>
dependencies 위에 키클락 설정을 위해 또다른 dependencyManagement xml을 복붙해줍니다.
<dependencyManagement>
    <dependencies>
        <dependency>
            <groupId>org.keycloak.bom</groupId>
            <artifactId>keycloak-adapter-bom</artifactId>
            <version>11.0.2</version>
            <type>pom</type>
            <scope>import</scope>
        </dependency>
    </dependencies>
</dependencyManagement>
튜토리얼에서의 버전은 10.0.2 였는데 제가 진행했던 버전에서는 11.0.2가 나와서 버전을 수정해주었습니다. 키클락 스타터를 사용하므로서 Tomcat, Undertow, Jetty 등과 같은 디펜던시는 추가 설정하지 않아도 됩니다.
2.3 타임리프 구성
3개의 웹페이지를 구성할 것입니다.
external.html - 일반 사용자들이 접근 가능한 페이지
<!DOCTYPE html>
<html xmlns:th="http://www.thymeleaf.org">
<head th:include="layout :: headerFragment">
</head>
<body>
<div class="container">
    <div class="jumbotron text-center">
        <h1>Customer Portal</h1>
    </div>
    <div>
        <p>Lorem ipsum dolor sit amet, consectetur adipiscing elit. Nam
            erat lectus, vehicula feugiat ultricies at, tempus sed ante. Cras
            arcu erat, lobortis vitae quam et, mollis pharetra odio. Nullam sit
            amet congue ipsum. Nunc dapibus odio ut ligula venenatis porta non
            id dui. Duis nec tempor tellus. Suspendisse id blandit ligula, sit
            amet varius mauris. Nulla eu eros pharetra, tristique dui quis,
            vehicula libero. Aenean a neque sit amet tellus porttitor rutrum nec
            at leo.</p>

        <h2>Existing Customers</h2>
        <div class="well">
            <b>Enter the intranet: </b><a th:href="@{/customers}">customers</a>
        </div>
    </div>
    <div id="pagefoot" th:include="layout :: footerFragment">Footer
    </div>
</div>
<!-- container -->

</body>
</html>
customers.html - 내부 접근 페이지로서, user Role 권한이 부여된 인증된 사용자만이 제한적 접근이 가능하다.
<!DOCTYPE html>
<html xmlns:th="http://www.thymeleaf.org">
<head th:include="layout :: headerFragment">
</head>
<body>
<div id="container">
    <h1>
        Hello, <span th:text="${username}">--name--</span>.
    </h1>
    <table class="table table-striped">
        <thead>
        <tr>
            <th>ID</th>
            <th>Name</th>
            <th>Address</th>
            <th>Service Rendered</th>
        </tr>
        </thead>
        <tbody>
        <tr th:each="customer : ${customers}">
            <td th:text="${customer.id}">Text ...</td>
            <td th:text="${customer.name}">Text ...</td>
            <td th:text="${customer.address}">Text ...</td>
            <td th:text="${customer.serviceRendered}">Text...</td>
        </tr>
        </tbody>
    </table>
    <div id="pagefoot" th:include="layout :: footerFragment">Footer
    </div>
</div>
<!-- container -->
</body>
</html>
layout.html - 두가지 조각을 보유한 간단한 레이아웃. 외부 페이지와 내부 페이지에 공통으로 사용된다.
<head th:fragment="headerFragment" xmlns:th="http://www.w3.org/1999/xhtml">
    <meta http-equiv="Content-Type" content="text/html; charset=UTF-8" />
    <title>Customer Portal</title>
    <link
            href="https://maxcdn.bootstrapcdn.com/bootstrap/3.3.7/css/bootstrap.min.css"
            rel="stylesheet"
            integrity="sha384-BVYiiSIFeK1dGmJRAkycuHAHRg32OmUcww7on3RYdg4Va+PmSTsz/K68vbdEjh4u"
            crossorigin="anonymous"/>
    <link
            href="https://cdn.datatables.net/1.10.16/css/jquery.dataTables.min.css"
            rel="stylesheet"/>
</head>

<div id="pagefoot" th:fragment="footerFragment">
    <p>Document last modified 2020/09/27.</p>
    <p>Copyright: Lorem Ipsum</p>
</div>
2.4 domain, repository, Controller
Customer.java
import lombok.Getter;
import lombok.Setter;

import javax.persistence.Entity;
import javax.persistence.GeneratedValue;
import javax.persistence.GenerationType;
import javax.persistence.Id;

@Entity
@Getter @Setter
public class Customer {

    @Id
    @GeneratedValue(strategy = GenerationType.IDENTITY)
    private long id;
    private String name;
    private String serviceRendered;
    private String address;

}
CustomerRepository.java
import org.springframework.data.jpa.repository.JpaRepository;

public interface CustomerRepository extends JpaRepository<Customer,Long> {
}
WebController.java
package com.example.demo.controller;

import com.example.demo.domain.Customer;
import com.example.demo.respository.CustomerRepository;
import org.springframework.beans.factory.annotation.Autowired;
import org.springframework.stereotype.Controller;
import org.springframework.ui.Model;
import org.springframework.web.bind.annotation.GetMapping;

import java.security.Principal;

@Controller
public class WebController {

    @Autowired
    private CustomerRepository customerDAO;

    @GetMapping(path = "/")
    public String index() {
        return "external";
    }

    @GetMapping(path = "/customers")
    public String customers(Principal principal, Model model) {
        addCustomers();
        Iterable<Customer> customers = customerDAO.findAll();
        model.addAttribute("customers", customers);
        model.addAttribute("username", principal.getName());
        return "customers";
    }

    // add customers for demonstration
    public void addCustomers() {

        Customer customer1 = new Customer();
        customer1.setAddress("1111 foo blvd");
        customer1.setName("Foo Industries");
        customer1.setServiceRendered("Important services");
        customerDAO.save(customer1);

        Customer customer2 = new Customer();
        customer2.setAddress("2222 bar street");
        customer2.setName("Bar LLP");
        customer2.setServiceRendered("Important services");
        customerDAO.save(customer2);

        Customer customer3 = new Customer();
        customer3.setAddress("33 main street");
        customer3.setName("Big LLC");
        customer3.setServiceRendered("Important services");
        customerDAO.save(customer3);
    }
}
/customers 경로면, DB에 저장된 모든 customer들을 볼 수 있고 결과가 모델에 더해진다. 이것은 thymeleaf에 보여지게 된다
Principal 객체에 있는 유저이름을 볼 수 있다.
2.5 Keycloak 구성
application.yml에서 keycloak에 대한 환경설정을 진행할 수 있다.
server:
  port: 8081
keycloak:
  auth-server-url: http://localhost:8180/auth
  realm: SpringBootKeycloak
  resource: login-app
  public-client: true
  principal-attribute: preferred_username
  security-constraints[0]:
    authRoles[0]: user
    securityCollections[0]:
      patterns[0]: /customers/*
2행 : 이전 포스팅에서 설명했듯, 8180 포트로 auth-server-url을 설정해준 것이도. admin-console 에서 생성한 client를 resource로 접근해준다.
5행 : 부가적으로, 우리는 principal-attribute를 preferred_username 으로 지정하여 적절한 유저인증을 컨트롤러에서 받을 수 있게 한다.
7행 ~ : 보안 설정도 적용할 수 있는데 다음과 같이 한다.
이러한 제약사항은 role user로 인증된 유저만 /customers/*의 모든 요청에 접근가능하다.
2.6 실행해보기
저는 인텔리제이를 사용하기 때문에 서버를 버튼으로 구동시킬 수 있었습니다.
http://localhost:8081/ 로 이동해봅시다.

다음과 같은 화면이 뜰텐데 리소스 정보를 보여주는 것을 클릭하면 SpringbootKeycloak realm 의 로그인 화면으로 이동합니다.
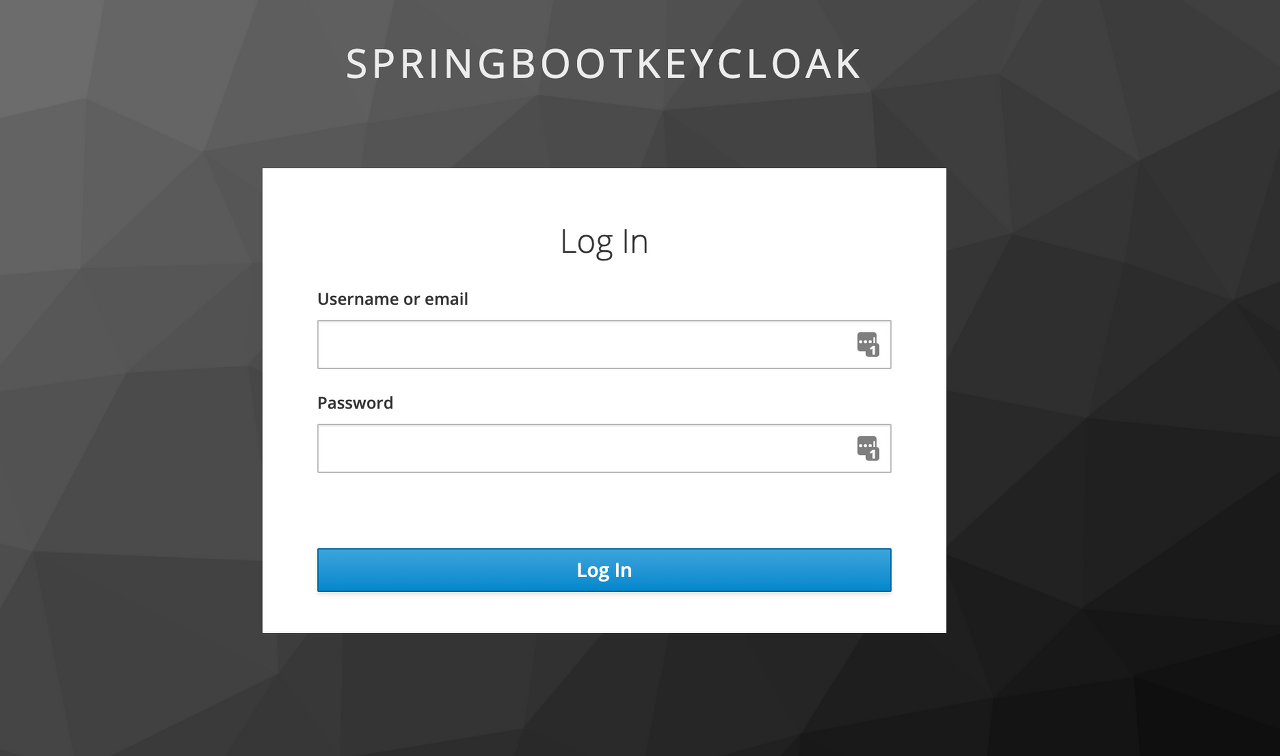
이전 포스팅에서 등록한 user1 / 123 을 입력해서 로그인해봅시다.

해당 정보로 이동할 수 있습니다.
3. 결론
키클락이라는 오픈소스를 이용해 클라이언트를 등록하고, 리소스에 접근하기위해 로그인하는 부분을 키클락에 위임하는 과정을 알아보았습니다. 다음 포스팅에서는 spring security도 적용시켜 보도록 하겠습니다. 긴 글 읽어주셔서 감사합니다.
'Dev' 카테고리의 다른 글
| 7. [SSO] Keycloak Default DB 변경해보기 (2) | 2020.10.08 |
|---|---|
| 6. [SSO] Keycloak & Springboot 적용기 - 3 (0) | 2020.09.28 |
| 4. [SSO] Keycloak & Springboot 적용기 (2) | 2020.09.26 |
| [SSO] Keycloak 공식문서 따라해보기 - 3 (2) | 2020.09.25 |
| [SSO] Keycloak 공식문서 따라해보기 - 2 (0) | 2020.09.24 |