728x90
반응형
1. 서론
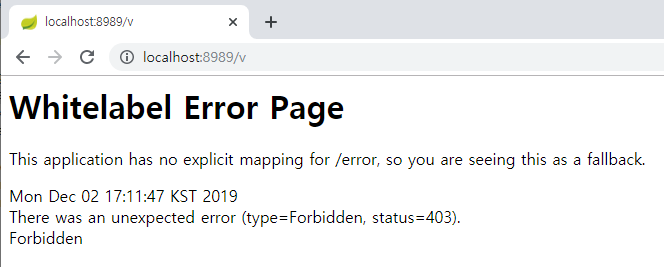
이번 포스팅에서는 접근 불가 처리해주는 페이지를 따로 구성해서 403에러가 나는 것을 보여주지 않도록! 하는 처리를 진행해보려고 합니다.

일반적으로 접근거부 에러가 발생하게 되면, 이런 방식으로 에러가 발생하게 되는데요. 이걸 사용자가 보기에 껄끄럽지 않도록 예쁘게 만들어보는 튜토리얼을 진행하려 합니다.
2. 본론
    @Override
    protected void configure(HttpSecurity http) throws Exception {
        http
                .authorizeRequests()
                .antMatchers("/","/loginUser","/login*").permitAll()
                .antMatchers("/user").hasRole("USER")
                .antMatchers("/manager").hasRole("MANAGER")
                .antMatchers("/admin").hasRole("ADMIN")
                .anyRequest().authenticated()
            .and()
                .formLogin()
                .loginPage("/login")                    // controller mapping
                .loginProcessingUrl("/login_proc")      // th:action="@{/login_proc}"
                .authenticationDetailsSource(authenticationDetailsSource)   // 추가 파라메터 설정작업시, 설정해주기
                .defaultSuccessUrl("/")
                .successHandler(customSuccessHandler)
                .failureHandler(customFailureHandler)
                .permitAll()
           ;
        // 인증 거부 관련 처리
        http.exceptionHandling().accessDeniedHandler(accessDeniedHandler());
    }

    private AccessDeniedHandler accessDeniedHandler() {
      CustomAccessDeniedHandler accessDeniedHandler = new CustomAccessDeniedHandler();
      accessDeniedHandler.setErrorPage("/denied");
      return accessDeniedHandler;
    }
- 다음과 같이 exceptionHandling()으로 체이닝하여 처리하고, accessDeniedHandler() 클래스도 작성해줍니다.
여기에서 CustomAccessDeniedHandler() 클래스를 생성해주었고, 이를 구현해주는 작업을 진행합니다.
CustomAccessDeniedHandler
package com.example.springsecurity.security;

import org.springframework.security.access.AccessDeniedException;
import org.springframework.security.web.access.AccessDeniedHandler;

import javax.servlet.ServletException;
import javax.servlet.http.HttpServletRequest;
import javax.servlet.http.HttpServletResponse;
import java.io.IOException;

public class CustomAccessDeniedHandler implements AccessDeniedHandler {

    private String errorPage;

    @Override
    public void handle(HttpServletRequest httpServletRequest,
                       HttpServletResponse httpServletResponse,
                       AccessDeniedException e) throws IOException, ServletException {

        String deniedUrl = errorPage + "?exception=" + e.getMessage();
        httpServletResponse.sendRedirect(deniedUrl);
    }

    public void setErrorPage(String errorPage){
        this.errorPage = errorPage;
    }
}
LoginController.java
다음은 컨트롤러를 만져줍니다. 권한을 받아, 모델로 연결시켜 넘겨주는 작업을 진행합니다.
    @GetMapping("/denied")
    public String accessDenied(@RequestParam(value = "exception",required = false) String exception,
                               Model model){
       Authentication authentication = SecurityContextHolder.getContext().getAuthentication();
       Account account = (Account)authentication.getPrincipal();
       model.addAttribute("username",account.getUsername());
       model.addAttribute("exception",exception);
       return "user/login/denied";
    }
<!DOCTYPE html>
<html lang="en" xmlns:th="http://www.w3.org/1999/xhtml">
<head>
<meta charset="UTF-8">
<title>denied</title>
</head>
<body>
<h1><span th:text="${username}" class="alert alert-danger"></span></h1>
<h3 th:text="${exception}"></h3>
</body>
</html>3. 결론

인증이 제대로 완료되었지만, 유저는 어드민 페이지에 접근 불가하기 때문에 에러 페이지로 이동되었습니다.
4. 마무리
오늘은 접근 권한 처리에 대해 알아보았습니다.
728x90
반응형
'Dev > SpringBoot' 카테고리의 다른 글
| 15. [Spring Boot] URL별 접근권한 DB에서 가져와서 처리하기(2) (3) | 2020.06.18 |
|---|---|
| 14. [Spring Boot] URL별 접근권한 DB에서 가져와서 처리하기(1) (3) | 2020.06.17 |
| 12. [springboot] Spring Boot 로그인 실패 이후 처리 (0) | 2020.06.12 |
| 11. [springboot] 스프링부트 로그인 성공 이후 처리 (0) | 2020.06.12 |
| 10. [springboot] 스프링부트 간단한 로그인/로그아웃 예제 (1) | 2020.06.11 |