1. 서론
- AuthenticationProvider방식으로 구현해보려고 합니다.
- UserDetailsService이랑 동작 방식은 같은데, 아직 둘 사이에 어떤 차이점이 있는지는 파악하지 못했습니다. 지식을 공유해주시면 감사히 배우겠습니다.
UserDetailsService방식으로 구현해보고 싶으시다면 다음 링크로 가시면 됩니다!
7. [springboot] Spring Security 간단 권한관리 예제 - UserDetailsService 방식
1. 서론 - 오늘은 userDetailsService를 이용하여 DB에서 정보를 가져와 인증하는 방식을 구현해보고자 합니다. - 이 글을 이해하면 로그인 기능을 구현할 수 있습니다. - 질문은 댓글로 언제든 환영합��
dkyou.tistory.com
2. 본론
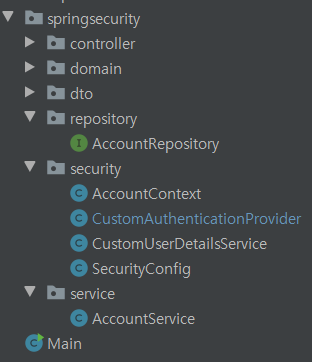
- 구조는 다음과 같습니다.
SecurityConfig.java
역시 보안 환경 설정을 해주는 것으로 시작합니다.
package com.example.springsecurity.security;

import lombok.AllArgsConstructor;
import lombok.extern.slf4j.Slf4j;
import org.springframework.boot.autoconfigure.security.servlet.PathRequest;
import org.springframework.context.annotation.Bean;
import org.springframework.context.annotation.Configuration;
import org.springframework.security.authentication.AuthenticationProvider;
import org.springframework.security.config.annotation.authentication.builders.AuthenticationManagerBuilder;
import org.springframework.security.config.annotation.web.builders.HttpSecurity;
import org.springframework.security.config.annotation.web.builders.WebSecurity;
import org.springframework.security.config.annotation.web.configuration.EnableWebSecurity;
import org.springframework.security.config.annotation.web.configuration.WebSecurityConfigurerAdapter;
import org.springframework.security.core.userdetails.UserDetailsService;
import org.springframework.security.crypto.bcrypt.BCryptPasswordEncoder;
import org.springframework.security.crypto.password.PasswordEncoder;

@Configuration
@EnableWebSecurity  // 이거 안해줘서 그동안 계속 안됬었음
@Slf4j
@AllArgsConstructor
public class SecurityConfig extends WebSecurityConfigurerAdapter {

    private final UserDetailsService userDetailsService;
    @Override
    public void configure(AuthenticationManagerBuilder auth) throws Exception {

//        String password = passwordEncoder().encode("1111");
//
//        auth.inMemoryAuthentication().withUser("user").password(password).roles("USER");
//        auth.inMemoryAuthentication().withUser("manager").password(password).roles("MANAGER");
//        auth.inMemoryAuthentication().withUser("admin").password(password).roles("ADMIN");
//        auth.userDetailsService(userDetailsService);
        auth.authenticationProvider(authenticationProvider());
    }

    @Bean
    public AuthenticationProvider authenticationProvider() {
        return new CustomAuthenticationProvider();
    }

    @Override
    // js, css, image 설정은 보안 설정의 영향 밖에 있도록 만들어주는 설정.
    public void configure(WebSecurity web) throws Exception {
        web.ignoring().requestMatchers(PathRequest.toStaticResources().atCommonLocations());
    }

    @Bean
    // BCryptPasswordEncoder는 Spring Security에서 제공하는 비밀번호 암호화 객체입니다.
    // Service에서 비밀번호를 암호화할 수 있도록 Bean으로 등록합니다.
    public PasswordEncoder passwordEncoder() {
        return new BCryptPasswordEncoder();
    }

    @Override
    protected void configure(HttpSecurity http) throws Exception {
        http
                .authorizeRequests()
                .antMatchers("/","/loginUser").permitAll()
                .antMatchers("/user").hasRole("USER")
                .antMatchers("/manager").hasRole("MANAGER")
                .antMatchers("/admin").hasRole("ADMIN")
                .anyRequest().authenticated()
            .and()
                .formLogin();
    }


}
- 중요한 점은 AuthenticationManagerBuilder 객체가 오버 라이딩된 configure함수와 @Bean 등록된 authenticationProvider() 메서드입니다. 여기에서 CustomAuthenticationProvider() 를 호출하여 코드를 짜게 됩니다.
- 지금까지 인메모리 방식과 UserDetailsService방식을 사용하여 진행한 것은 주석처리 하였습니다.
CustomAuthenticationProvider.java
- AuthenticationProvider를 implement 하게 되면 authenticate, supports 메서드를 구현할 수 있도록 도와줍니다.
package com.example.springsecurity.security;

import org.springframework.beans.factory.annotation.Autowired;
import org.springframework.security.authentication.AuthenticationProvider;
import org.springframework.security.authentication.BadCredentialsException;
import org.springframework.security.authentication.UsernamePasswordAuthenticationToken;
import org.springframework.security.core.Authentication;
import org.springframework.security.core.AuthenticationException;
import org.springframework.security.core.userdetails.UserDetailsService;
import org.springframework.security.crypto.password.PasswordEncoder;


public class CustomAuthenticationProvider implements AuthenticationProvider {

    @Autowired
    private UserDetailsService userDetailsService;

    @Autowired
    private PasswordEncoder passwordEncoder;


    // 검쯩을 위한 구현
    @Override
    public Authentication authenticate(Authentication authentication) throws AuthenticationException {

        String username = authentication.getName();
        String password = (String)authentication.getCredentials();

        AccountContext accountContext = (AccountContext) userDetailsService.loadUserByUsername(username);

        // password 일치하지 않으면!
        if(!passwordEncoder.matches(password,accountContext.getAccount().getPassword())){
            throw new BadCredentialsException("BadCredentialsException");
        }

        UsernamePasswordAuthenticationToken authenticationToken
                = new UsernamePasswordAuthenticationToken(
                        accountContext.getAccount(),
                null,
                accountContext.getAuthorities());

        return authenticationToken;
    }

    // 토큰 타입과 일치할 때 인증
    @Override
    public boolean supports(Class<?> authentication) {
        return UsernamePasswordAuthenticationToken.class.isAssignableFrom(authentication);
    }
}
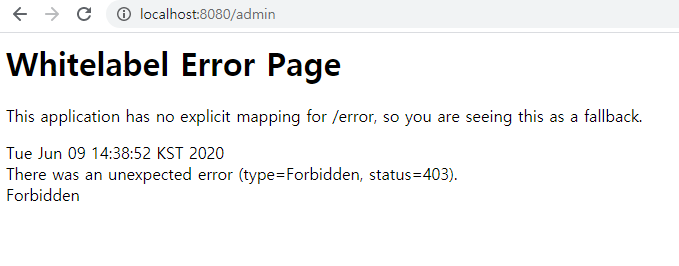
3. 결론

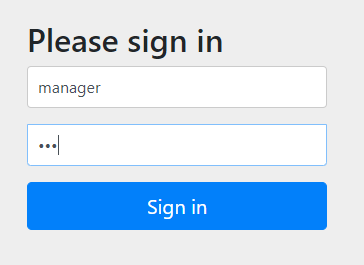
동일한 로직으로 권한에 맞게 로그인 처리가 되는 것을 볼 수 있습니다!

4. 마무리
- AuthenticationProvider객체를 이용하여 DB 정보를 가져와서 로그인 처리하는 과정을 공부해보았습니다.
'Dev > SpringBoot' 카테고리의 다른 글
| 10. [springboot] 스프링부트 간단한 로그인/로그아웃 예제 (1) | 2020.06.11 |
|---|---|
| 9. [springboot] 간단 커스텀 로그인 예제 (2) | 2020.06.11 |
| 7. [springboot] Spring Security 간단 권한관리 예제 - UserDetailsService 방식 (1) | 2020.06.09 |
| 6. [springboot] Spring boot 기초 회원가입 예제 (5) | 2020.06.09 |
| 5. [springboot] Spring Security 간단 권한관리 예제 (4) | 2020.06.08 |